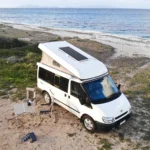
Introduction: Why Flexible Solar Is Taking Over RV Roofs
RV owners want more freedom—more days off-grid, fewer generator hours, and reliable power for essentials like lights, fans, phone charging, laptops, Starlink, and 12V fridges. But traditional rigid glass panels aren’t always the easiest match for RV life, especially when you deal with:
-
Curved or lightly reinforced roofs
-
Limited roof space around AC units, vents, and skylights
-
Height restrictions and wind drag concerns
-
Frequent vibration and temperature swings on the road
That’s where flexible RV solar panels shine. They’re lightweight, low-profile, and easier to integrate on roofs where a bulky mounting system would be a headache.
This guide walks you through everything you need—how flexible panels work, how to pick the right ones, installation options, wiring basics, and common mistakes to avoid—so you can build a solar setup that actually performs.
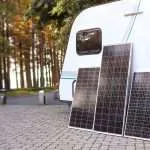
What Are Flexible RV Solar Panels?
Flexible solar panels are thin, lightweight modules designed to conform (to a degree) to curved surfaces and reduce roof load. Most flexible RV panels use one of these construction styles:
-
Polymer-laminated flexible panels
Lightweight and low-profile, often bonded directly to the roof. -
Semi-flex panels (reinforced composite backsheet)
Still slim and light, but designed for better structural stability and durability.
Flexible panels are not “rubber.” They typically allow gentle curvature only. Over-bending can damage cells and reduce lifespan.
Flexible vs Rigid RV Solar Panels: Quick Comparison
Flexible panels are usually best when:
-
Your roof can’t comfortably support heavy glass modules
-
You want a very low-profile setup (less wind drag, stealthier look)
-
You’re working around a lot of roof obstacles
-
You need faster, cleaner installation with fewer brackets
Rigid panels are usually best when:
-
Maximum lifespan is your #1 goal (especially for full-time RV use)
-
You have plenty of flat roof space
-
You want the easiest long-term serviceability (swap a panel easily)
Reality check: Many RV owners mix both—rigid where space allows, flexible where shape/weight demands it.
Key Benefits of Flexible RV Solar Panels
1) Lightweight & roof-friendly
Flexible panels can dramatically reduce roof load compared with traditional glass panels and heavy mounting hardware. That matters on lightweight RV roofs and older rigs.
2) Low profile = less wind drag + fewer clearance issues
If you’ve worried about height, branches, or high winds, flexible panels sit closer to the roof surface.
3) Easier placement around roof clutter
Vents, antennas, skylights, and AC units eat roof real estate. Flexible panels give you more layout options.
4) Cleaner aesthetics
Many people simply prefer a flush, integrated look.
The Trade-Offs (Be Honest Before You Buy)
Flexible panels are great—but they’re not magic. Here are the common downsides:
-
Heat can reduce performance if panels are bonded directly with minimal airflow underneath.
-
Cheaper flexible panels may degrade faster (yellowing, delamination, microcracks).
-
Replacement can be harder if you fully bonded them with strong adhesives.
-
Not all “flexible” panels are truly durable for long-term highway vibration.
If you want flexible panels to last, the key is quality + correct installation + heat management.

How to Choose Flexible Solar Panels for Your RV
Here’s what matters most (and what many “top 10” lists forget).
1) Efficiency and real roof power density
RV roofs are crowded. The useful metric is:
How many watts can you fit per square foot (or per square meter)?
Higher efficiency panels produce more power in the same footprint. If your roof space is limited, prioritize efficiency.
2) Build quality: durability on the road
Look for panels designed to handle:
-
Vibration and flexing from highway travel
-
Temperature cycles (hot desert days, cold mountain nights)
-
UV exposure (long-term sunlight)
Ask about:
-
Lamination quality
-
Surface material UV resistance
-
Cell crack resistance design
-
Long-term field track record
3) Bend radius: “flexible” has limits
Only bend within the manufacturer’s stated limit. Gentle curves are fine; sharp bends can permanently damage cells.
4) Voltage choice: 12V vs 24V “nominal” panels
Most RV systems are 12V batteries, but your solar array voltage can be higher (especially with MPPT controllers).
General rule:
-
MPPT controller gives you more flexibility and better performance.
-
Wiring panels in series can reduce current and help with long cable runs (but shading risk changes).
5) Warranty and support
Flexible panels vary wildly by brand and quality. A real warranty and responsive support team matter more here than with rigid glass panels.
Sizing Your RV Solar System (Simple, Practical Method)
Before buying panels, estimate daily energy use. Here’s a realistic starter list:
-
Phone charging: 10–20Wh/day each
-
Laptop: 50–150Wh/day
-
LED lights: 30–80Wh/day
-
Roof fan: 100–300Wh/day
-
12V fridge: 600–1200Wh/day (varies a lot)
-
Starlink: 300–800Wh/day (varies by use)
Step 1: Estimate daily watt-hours (Wh)
Add everything you actually use in a day.
Step 2: Convert to required solar watts
A quick US-friendly planning shortcut:
Solar watts needed ≈ Daily Wh ÷ (Peak Sun Hours × 0.7)
-
Peak Sun Hours varies by location/season (Southwest ≠ Pacific Northwest)
-
0.7 accounts for real-world losses (heat, wiring, controller, dirt)
Example:
If you use 1200Wh/day, and get 5 peak sun hours:
1200 ÷ (5 × 0.7) ≈ 343W
In real RV life, you’d round up (for cloudy days) → 400–500W is more comfortable.
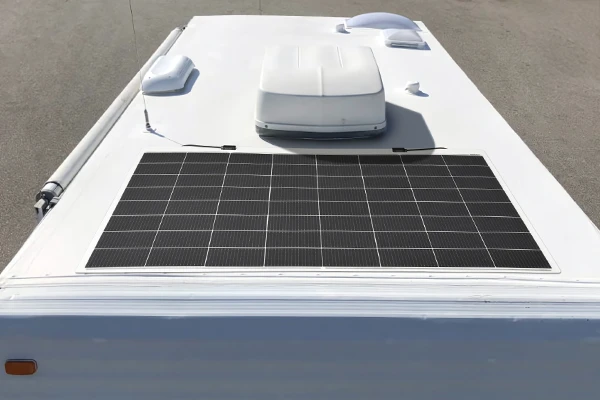
Installation: 3 Proven Ways to Mount Flexible Panels on an RV Roof
Option A: Bonded (Direct Adhesive Mount)
Best for: lowest profile + cleanest look
Watch out for: heat buildup and future removal
Tips:
-
Use a high-quality RV-safe adhesive/sealant rated for UV and temperature
-
Leave drainage paths—don’t “seal trap” water
-
Plan cable entry carefully with a proper roof gland
Option B: Semi-raised mounting for airflow
Best for: better cooling + better performance + longer panel life
Even a small air gap can help reduce heat stress.
Ways to do it:
-
Use thin mounting strips or low-profile spacers
-
Avoid blocking airflow across the panel back surface
Option C: Hybrid layout (Rigid + Flexible)
Best for: maximum watts + smart use of odd roof spaces
Example strategy:
-
Put rigid panels on flat open zones
-
Use flexible panels on curved sections or around vents
Wiring Basics (Without Overcomplicating It)
A solid RV solar setup usually includes:
-
Solar panels (your array)
-
Charge controller (MPPT preferred for flexibility)
-
Battery bank (LiFePO4 is common in 2025 builds)
-
Fuses/breakers + disconnects (for safety and serviceability)
-
Inverter (only if you need AC power)
Series vs Parallel in an RV
-
Series: higher voltage, lower current (efficient over long runs), but shading on one panel can impact the string more.
-
Parallel: keeps voltage lower, handles partial shading better, but increases current (thicker wire, more combiner complexity).
If your roof has partial shade risk (AC unit shadows, roof racks), many RVers prefer parallel or mixed configurations.
Heat, Shade, and Real-World RV Performance
Heat is the silent performance killer
Flexible panels mounted flush to the roof can run hot. As temperatures rise, voltage drops and output falls. If you camp in hot regions, prioritize:
-
panels known for better heat tolerance,
-
airflow under panels,
-
and an MPPT controller.
Shade matters more than most people expect
On RV roofs, shadows come from:
-
AC units, vents, antennas
-
roof racks
-
nearby trees, poles, buildings
Practical tips:
-
Keep panels away from tall roof objects when possible
-
Consider layouts that reduce “one shadow hits everything” scenarios
-
If you often camp under trees, your system should plan for partial shading
Common Mistakes (And How to Avoid Them)
-
Buying the cheapest flexible panel
Low-cost panels often degrade faster under UV and heat. -
Bonding panels with zero airflow
Great for looks, bad for temperature. -
Skipping roof prep
Poor surface prep leads to failed adhesion and water issues. -
Undersizing wiring or skipping protection
Use proper fusing/breakers and correct wire gauge. -
No plan for maintenance or replacement
Think ahead: “If one panel fails, how painful is it to remove?”
Maintenance: Keep Output High
-
Wash dust and grime (especially after desert travel)
-
Inspect sealant and cable entry glands every few months
-
Watch for early signs of delamination or bubbling
-
Track performance: if output drops sharply, troubleshoot shading, wiring, or panel damage
Who Should Choose Flexible RV Solar Panels?
Flexible panels are ideal if you:
-
own a lightweight-roof RV or camper van
-
want a low-profile, stealthy setup
-
need to maximize watts in odd roof spaces
-
prioritize easy integration and reduced roof load
Rigid panels may be better if you:
-
want the longest possible lifespan with easy swaps
-
have abundant flat roof space and solid roof structure
-
don’t mind extra height and mounting hardware
FAQ (Google-friendly)
1) Are flexible RV solar panels worth it?
Yes—especially when roof weight, curvature, and low-profile installation matter. Just avoid ultra-cheap panels and manage heat properly.
2) How long do flexible solar panels last on an RV?
Quality varies widely. With good materials and correct mounting (especially with some airflow), flexible panels can last for years. Poor-quality panels may degrade much faster under UV and heat.
3) Do flexible panels produce less power than rigid panels?
Not necessarily in rated watts, but real-world output can drop more if they run hotter (flush-mounted). Better cooling often improves performance.
4) Can I walk on flexible solar panels?
Most manufacturers do not recommend walking on them. Even if they survive, microcracks can reduce performance over time.
5) Do I need an MPPT charge controller?
Not strictly, but MPPT is strongly recommended for better efficiency and more wiring flexibility—especially with higher-voltage arrays.
6) What’s the best way to mount flexible panels on an RV?
A semi-raised mount that allows airflow is often the best balance of performance and longevity. Fully bonded flush installs look clean but can run hotter.
7) Series or parallel wiring for flexible panels?
If shading is common (RV roof obstacles), parallel or mixed configurations often perform better. For long cable runs, series reduces current and can be more efficient.
8) Can flexible panels be used with lithium (LiFePO4) batteries?
Yes. Pair them with a compatible charge controller configured for your battery chemistry.
9) How many watts of solar do I need for RV boondocking?
Many weekend setups start around 200–400W. For fridges, Starlink, or extended off-grid trips, 400–800W+ is common depending on usage and location.
10) What’s the biggest failure cause for flexible RV panels?
Heat + UV exposure + poor lamination quality, plus installation issues like bad adhesion or trapped moisture.